2 GENIUS DIY Van Life Upgrades You Need To Try! Gearboxes & Power Port

Today, I’m excited to share two new DIY projects from my camper build. I’ll show you how I converted some inexpensive toolboxes into watertight rooftop gear storage, and how I safely installed an AC power port in the back hatch of my minivan. If you’re looking to upgrade your setup without spending a fortune, buckle up—let’s get into it!
Links to products, devices and gear featured in this video
DIY Rooftop Gear Storage on a Budget
Rooftop gear boxes are a great way to store extra stuff without cluttering up the inside of your rig, but let’s be real—they're crazy expensive. Some cases can cost anywhere from $300 to $500 each. No way was I paying that.
Instead, I grabbed three medium-sized Rigid brand toolboxes from Home Depot for about $45 each. They're already waterproof, so the main challenge was figuring out how to mount them securely and keep them sealed.
For the rails, I used slotted aluminum Unistrut, cutting two 66-inch sections with a miter saw (using a metal-cutting blade/be careful, sparks fly everywhere). I sprayed the rails with black acrylic enamel paint to help fight rust and added rubber end caps to clean up the look and cover the sharp edges.
Since the toolboxes are about 12 inches deep, I spaced the rails about 10 inches apart. I set the boxes on top to figure out the best alignment, then marked bolt locations using a fine-tip white Sharpie slipped into the rail slots from underneath. After drilling holes in each box, I bolted them down with 3/8-inch fully threaded hex bolts, flat washers, and lock nuts.
To ensure a watertight seal, I applied black sealing tape (this rubbery stuff works wonders!) under each washer. Thousands of miles and plenty of rainstorms later—zero leaks. Tape for the win.
I also used black gaffer tape to cover the orange Rigid logos for a cleaner look.
For security, I permanently mounted the front and rear boxes with nylon cone nuts inside the rails (hard to access from underneath, making them tough to steal). The middle box is removable. I bonded washers to the rails with J-B Weld and used wing nuts for quick on-off access. To prevent easy theft, I added steel eyebolts to both the rail and the box, and locked them together with a Brinks extended shackle padlock.
The rails themselves mounted easily to my Thule crossbars using T-bolts through the tracks.
Cost Breakdown:
- Three Rigid toolboxes: $135
- Unistrut rails: $31
- End caps: $8
- Spray paint: $14
- Sealing tape: $14
- Eyebolts: $20
- Stainless steel spacer: $14
- Brinks padlock: $12
- Stainless hardware: ~$20
Grand Total: $254
Not bad compared to paying $300+ per box!
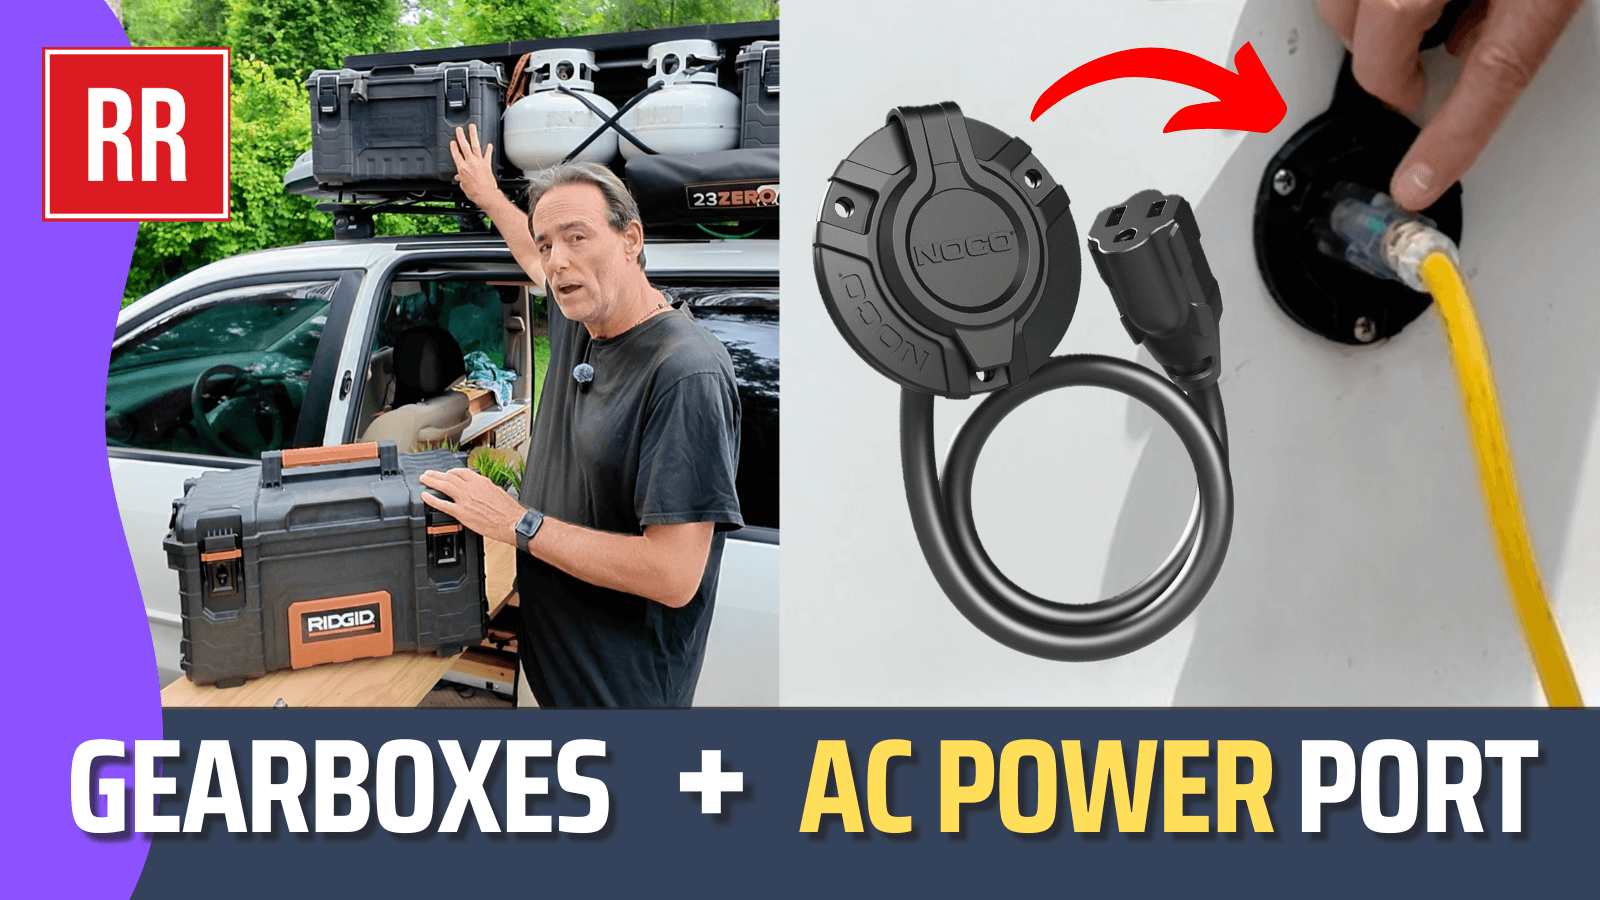
Installing a 15-Amp Shore Power Port
Next up, I installed a 15-amp NOCO AC port to plug into shore power or a generator. Here’s how I did it:
Tools & Materials:
- NOCO 15A AC power port
- Drill and 2-inch hole saw
- Smaller drill bits for pilot holes
- Three small bolts and lock nuts
- Painters tape
- Phillips screwdriver
I wanted the port in the rear hatch, but if your rig has a sliding window, you’ll want to choose a different spot (maybe the bumper or fender well). After removing the interior plastic trim, I scoped out an open area with single-layer sheet metal—no internal bracing or double walls to mess with.
I taped the area inside and out to protect the paint, drilled a small pilot hole from inside, then used the 2-inch hole saw to cut from the outside. Pro tip: take your time and wear eye protection—cutting through metal is no joke. I used needle-nose pliers to remove the sharp cutout.
Once the hole was made, I used the template included with the NOCO port to mark three small holes for mounting. Instead of using the self-tapping screws that come with the kit, I drilled pilot holes and used bolts and lock nuts. (Why? Because bolts hold up better over thousands of miles and vibrations.)
After tightening everything down, I reinstalled the hatch trim, adding a little desk grommet to cleanly route the power cable inside. Now, I can easily plug my van into shore power, and the connection is clean, safe, and secure.
Thanks for following along!