DIY 12V Camper Wiring | How to Splice, Crimp & Heat Shrink Like a Pro
When I first started building out my camper, one of the most intimidating projects was the electrical system. I had a long list of appliances I wanted to run—everything from a microwave and air fryer to a portable fridge, water pump, Starlink, CPAP machine, and even an electric blanket. Add in my laptop, camera gear, wireless mics, air pump, LED lights, and a dozen USB gadgets, and you can see why I needed a reliable wiring setup.
In this post, I’ll walk you through how I wired my van’s 12V system, including the fuse panel, power station connections, and some of my favorite wiring tips and tricks. If you’re tackling your own DIY camper build, I think you’ll find this guide helpful.

Links to products, devices and gear featured in this video
The Power Station Setup
At the heart of my system is a Bluetti AC200L (was a Bluetti AC200Max) power station. This powerhouse handles both AC and DC loads, which makes it incredibly versatile. I’ve got dedicated AC inputs running to different spots in the van—one to the countertop for small appliances, another hidden line for the microwave, and USB-C power delivery up to my laptop. On the DC side, I run my CPAP machine overnight, along with outputs to the fuse panel that power the fridge, freezer, fan, TV, and water pump.
To keep things safe, I installed a 200-amp inline circuit breaker between my inverter and the starter battery. This prevents accidental overloads when I’m pulling power to charge the Bluetti while driving. I’ll admit, the alternator setup isn’t perfect—I sometimes get low-voltage warnings when pushing it too hard—but it’s a workable backup when the sun isn’t giving me enough solar input.
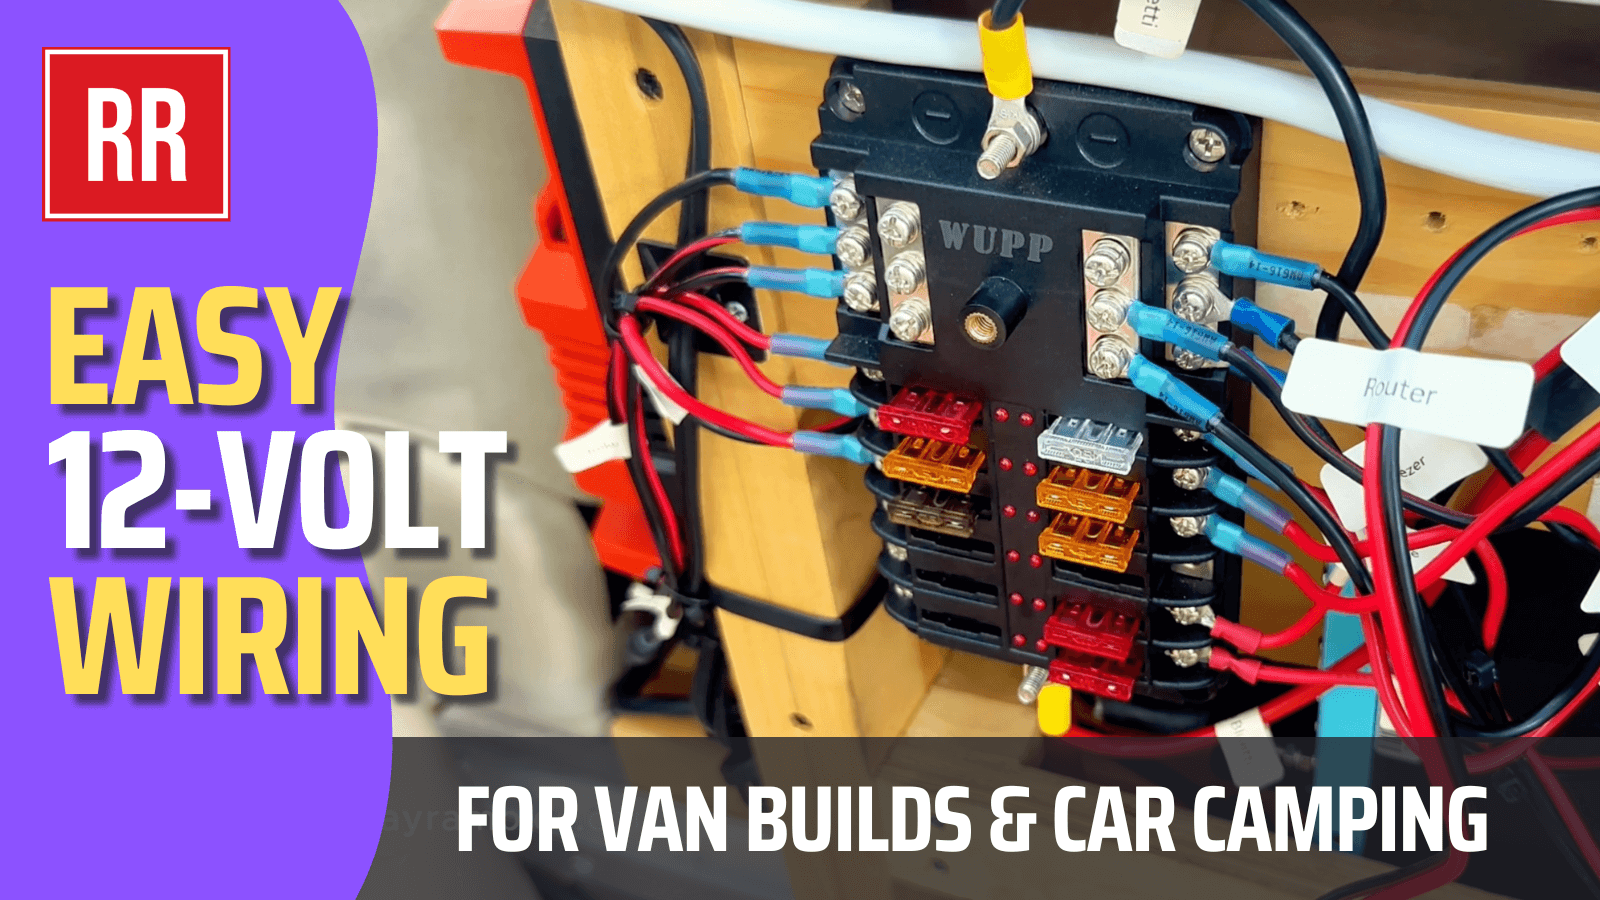
Why I Added a 12V Fuse Panel
You might be wondering: if the Bluetti has DC outputs, why add a fuse panel? For me, there were two big reasons.
- Expandability. I quickly ran out of outputs on the Bluetti, and the fuse panel gave me the flexibility to add more devices.
- Accessibility. My power station lives in the trunk under the bed, which means it’s not always easy to reach. By installing the fuse panel inside the sliding door, I can quickly check fuses and troubleshoot without tearing apart my setup.
Pro tip: always label your wires on both ends. Trust me, once you have more than a handful of circuits, things get confusing fast. A cheap thermal label maker has been a lifesaver.
Running Wires in a Camper
Running wires in a van isn’t always straightforward. Many of mine had to snake under the bed rail, behind cabinets, and through tight holes I drilled in the furniture. My favorite trick for this is using a long, thin wood dowel—tape the wire to the end of it, push it through the hole, and pull it out the other side. It’s a simple hack, but it makes routing wires so much easier.
Wiring a New Device: Step by Step
To give you a real example, I recently wired in my travel router that connects to my Starlink Mini. Here’s the process:
- Strip the wire. I use a simple adjustable wire stripper that gives me a clean strip every time.
- Crimp the connector. I prefer color-coded crimp connectors with the proper crimping tool for a secure fit.
- Heat shrink for protection. A small heat gun makes this quick and professional-looking.
- Connect to the fuse panel. With the power off and fuse removed, I attach the positive and negative leads.
- Insert the fuse and test. Once powered back on, the router lit up perfectly, and within seconds my Starlink network appeared.
That’s the beauty of having a properly wired system—adding new devices becomes fast, safe, and straightforward.
Final Tips for DIY Wiring
If you’re setting up your own 12V system, here are my three must-follow rules:
- Label everything. You’ll thank yourself later.
- Make connections accessible. Don’t bury your fuse panel where you can’t reach it.
- Use the right tools. A proper crimper and heat shrink connectors make a world of difference.
Wrapping Up
Wiring a camper or van might sound overwhelming at first, but once you break it down into steps—power station, fuse panel, wiring runs, and proper connections—it becomes manageable. My van now powers dozens of devices reliably, and I’ve learned a ton along the way.
If you’re tackling your own DIY camper electrical project, I hope this walkthrough gives you the confidence to dive in. With a little planning, the right tools, and some patience, you can create a safe and efficient system that keeps you powered up wherever the road takes you.